11.4 网站后台管理系统
学习目标
通过示例,进一步理解MVC。
11.4.1 后台登录功能
网站后台登录功能,通常需要一个登录表单页面和一个表单提交结果处理页面来完成。而在MVC 4项目中,需要把这些行为都转换成M、V、C形式,不难看出,网站后台登录功能可以创建一个登录控制器以返回一个登录表单视图,而登录表单提交的结果处理只是一个行为,于是通过给控制器中增加一个处理方法即可完成,这样一来,需要在登录控制器(LoginController)中增加两个方法,并给其中登录方法创建一个视图即可完成。
(1)在项目Company_MvcApplication的Controllers中增加一个控制器,命名为LoginController,然后在其中编写两个方法,分别为Login、DoLogin,接下来给出这两个方法的完整代码。
  public class LoginController : Controller
    {
       //
       // GET: /Login/
       DBHelper db = new DBHelper();
       public ActionResult Login()
       {
          ViewBag.pagetitle = "网站后台管理登录";
          ViewBag.ConfigRow = db.GetRow("select company,logo
          from tb_config");
          return View();
       }
       public string DoLogin(string adminuser,string pwd)
       {
          string result = string.Empty;
          //这里可以直接得到表单中传递的值,其中的pwd要做MD5加密处理一下
            string userpwd = Common.Get_MD5(pwd);
          //接下来就是根据用户名和口令处理登录的业务逻辑代码
            string sql = "select pwd from tb_admin where
          adminuser=@adminuser";
          Hashtable ht = new Hashtable();
          ht.Add("@adminuser",adminuser);
          DataRow row = db.GetRow(sql, ht);
          if (row == null)
          {
              result = "用户名称输入错误!";
          }
          else
          {
              if (userpwd == row["pwd"].ToString())
              {
                   Response.Cookies["adminuser"].Value = adminuser;
                   Response.Redirect("/Admin/Index/");
              }
              else
              {
                   result= "口令输入错误";
              }
          }
          return "<script>alert('" + result + "');history.
          back();</script>";
       }
}
(2)很显然,可以看出“LoginController”控制器用到了Models中的DBHelper类,所以在LoginController.cs源文件的顶部需要引入Models项目,即“usingCompany_MvcApplication.Models;”。而其中的Login方法最后返回一个视图,所以需要给这个方法增加一个视图,直接在Login方法体中右击,在弹出的快捷菜单中选择“添加视图”,命令如图11-22所示。
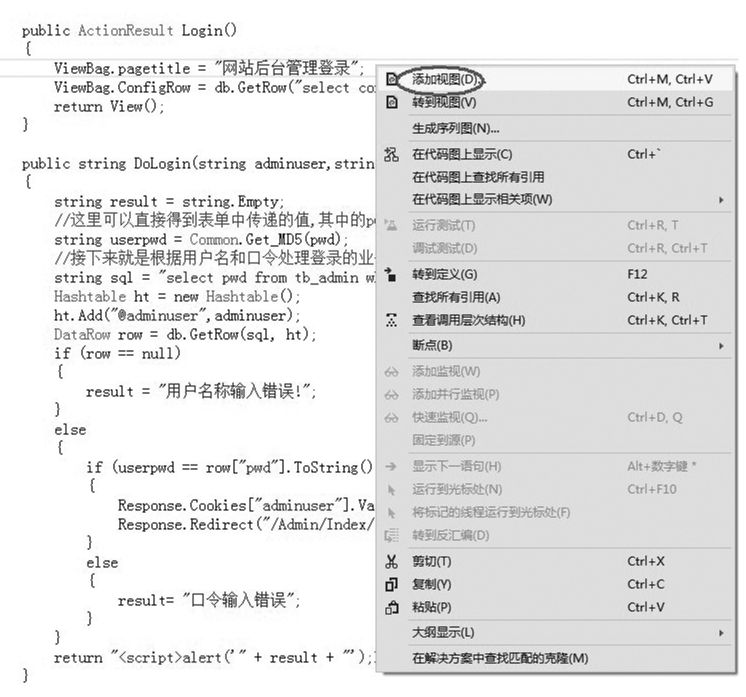
图11-22 给方法添加对应视图菜单窗口
(3)弹出如图11-23所示的对话框。

图11-23 “添加视图”对话框
(4)在图11-23中会自动生成视图名称和对应的方法名称是一致的,这里最好不要修改视图名称,然后“视图引擎”项目选择“ASPX”,禁用其他复选框,最后单击“添加”按钮即可完成Login方法视图的添加。此时系统会自动在Views文件夹中创建一个Login文件夹(系统会自动取控制器名称的前缀,即LoginController中的Login),同时在Views/Login文件夹中已经创建了一个Login.aspx页面,这就是创建好的视图。此时项目文件如图11-24所示。
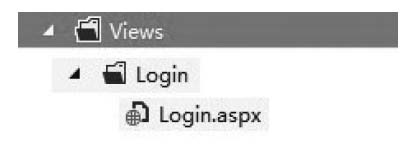
图11-24 Views/Login文件夹列表文件
(5)然后打开Login.aspx文件,完成表单页面的排版制作,接下来给出视图页面Login.aspx的完整源码,读者也可以自行设计表单页面。
<%@ Page Language="C#" Inherits="System.Web.Mvc.ViewPage<dynamic>" %>
<%@ Import Namespace="Company_MvcApplication.Models" %>
<IDOCTYPE html>
<html>
<head runat="server">
<meta name="viewport" content="width=device-width" />
<title><%:ViewBag.pagetitle %></title>
<link href="/Content/Login.css" rel="stylesheet" />
<script src="/Scripts/jquery-1.7.2.min.js"></script>
<script type="text/javascript">
function check() {
if ($("#adminuser").val() == "") {
alert("用户名称不能为空!");
$("#adminuser").focus();
return false;
}
if ($("#pwd").val() == "") {
alert("登录密码不能为空!");
$("#pwd").focus();
return false;
}
return true;
}
</script>
</head>
<body>
<div class="logo_header">
<div style="width: 960px; color: #ccc; text-align: left;
height: 30px; padding-top: 10px;">
<div style="float: left; height: 32px;">
<img src="<%:ViewBag.ConfigRow["logo"] %>" width
="100" height="30" /></div>
<div style="float: left; height: 32px; font-size: 22px;
letter-spacing: 2px; padding-left: 20px;"><%:ViewBag.
ConfigRow["company"] %></div>
</div>
</div>
<form action="/Login/DoLogin" method="post" id="form1" name=
"form1" onsubmit="return check()">
<div class="login_cont">
<div style="width: 900px; margin: 0 auto;">
<div class="login_di">
<img src="/Content/AdminImages/di.png" /></div>
<div class="cont_1">
网站后台管理<br />
<span>欢迎进入网站后台系统</span>
</div>
<div class="login_cont1">
<div style="font-size: 22px; color: #5699df;
border-bottom: 1px solid #666; margin-right:
5px; height: 35px; margin-bottom: 8px;">用户登录
</div>
<table width="388" border="0">
<tr>
<td width="123" align="center" valign
="middle">用户名称</td>
<td width="255" align="left" valign=
"middle">
<input type="text" class="username"
id="adminuser"name="adminuser" /
></td>
</tr>
<tr>
<td width="123" align="center" valign
="middle">登录密码</td>
<td width="255" align="left" valign
="middle">
<input type="password" class="pwd"
id="pwd" name="pwd" /></td>
</tr>
</table>
<table width="369">
<tr>
<td width="179" align="right">
<input type="image" id="btn"src
="/Content/AdminImages/login.png"
/></td>
<td width="10"> </td>
<td width="164" align="left"><a href
="/">返回首页</a></td>
</tr>
</table>
</div>
</div>
</div>
</form>
<div class="foot" style="line-height: 25px;">
<a href="/">网站首页</a> | <a href="/Home/About">关于我们
</a> | 友情链接:
<select id="friend" name="friend" style="font-size: 12px; color:
#777777;" onchange="window.open($(this).val());">
<option value="#">==选择友情链接==</option>
<%
System.Data.DataTable friendTable = Common.GetFriend
Table();
for (int i = 0; i < friendTable.Rows.Count; i++)
{
Response.Write("<option value='" + friendTable.Rows[i]
["url"] + "'>" + friendTable.Rows[i]["title"] + "
</option>");
}
%>
</select>
<br />
<%=Common.GetFixRow(3)["content"].ToString () %>
<br />
版权所有:<%:Common.GetConfig("company") %><br />
技术支持:<a href="http://www.haisitong.com/" target="_blank">
北京海思通科技公司</a>
</div>
</body>
</html>
(6)访问地址/Login/Login/,按照系统默认定义的路由规则,其实就是访问Login控制器(LoginController)中的Login方法,最终Login方法返回一个Login.aspx视图呈现在客户端浏览器中,如图11-25所示。
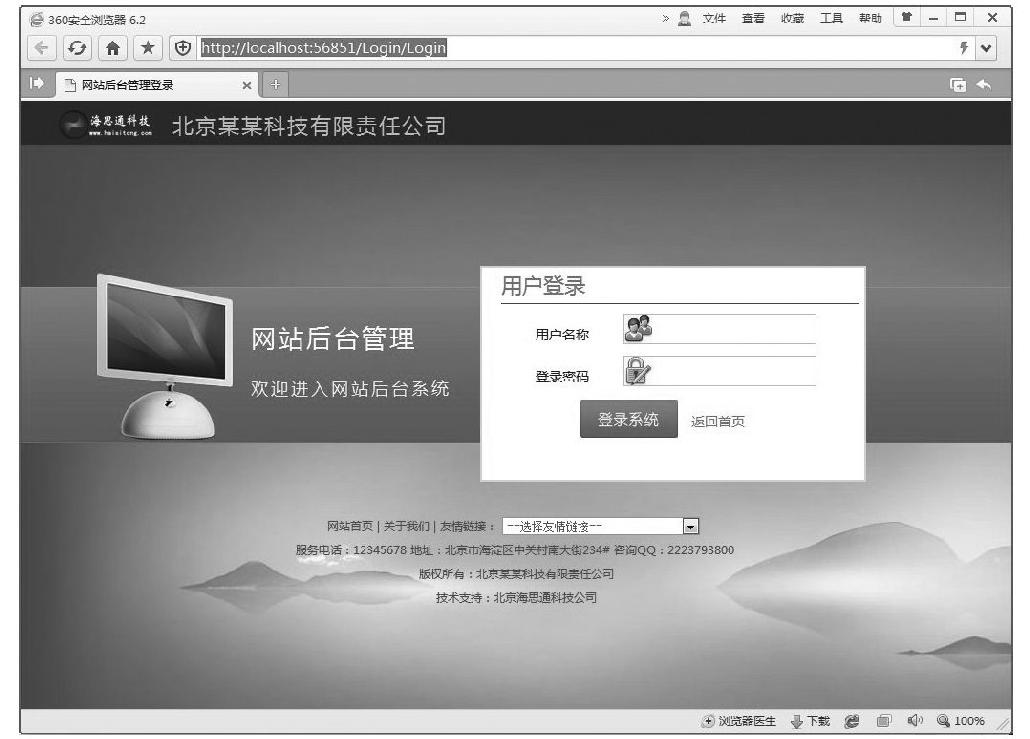
图11-25 后台登录表单-预览效果
(7)而在上面Login.aspx视图源码中,action="/Login/DoLogin"就是给出了表单提交给了Login控制器的DoLogin方法,系统会自动把页面的表单元素adminuser、pwd传递给Login控制器的DoLogin方法,然后交由DoLogin方法去处理,如果登录成功,就用到其中的“Response.Redirect("/Admin/Index/");”,实现网页重定向到Admin控制器(AdminController)的Index方法中,即后台管理主页。
11.4.2 后台主框架页面
后台主页属于框架结构设计,登录成功后,在浏览器中看到的效果如图11-26所示。

图11-26 网站后台管理主页-预览效果
很显然,涉及3个视图页面,即框架主页/Views/Admin/Index.aspx、/Views/Admin/Left.aspx、/Views/Admin/Main.aspx。所以,先创建一个Admin控制器文件(AdminController.cs),然后增加3个方法,显然这3个方法都有具体视图的返回,接下来先给出Admin控制器的完整代码。
using System;
using System.Collections.Generic;
using System.Linq;
using System.Web;
using System.Web.Mvc;
using Company_MvcApplication.Models;
namespace Company_MvcApplication.Controllers
{
  public class AdminController : Controller
  {
    //
    // GET: /Admin/
    public ActionResult Index()
    {
       if (!Common.IsLogin())
       {
          Response.Redirect("/Login/Login");
       }
       }
    public ActionResult Left()
    {
       if (!Common.IsLogin())
       {
          Response.Redirect("/Login/Login");
       }
       return View();

    }
    public ActionResult Main()
    {
       if (!Common.IsLogin())
       {
          Response.Redirect("/Login/Login");
       }
       return View();
    }

  }
}
其中,加粗的代码是用来控制用户登录成功后才可以访问该方法,在Models的Common类中定义了这个静态方法IsLogin,接下来给出该静态方法的源码,其实就是使用Cookie变量值来判断用户是否已经登录了,如果没有登录,就直接返回登录页,即Login控制器的Login方法。
public static bool IsLogin()
{
  bool result = false;
  if (HttpContext.Current.Request. Cookies["adminuser"]
  ==null || HttpContext.Current.Request.Cookies["adminuser"]
  .Value=="")
  {
    result = false;
  }
  else
  {
    result = true;
  }
  return result;
}
(1)后台框架主页视图Index.aspx完整源码如下。
<%@ Page Language="C#" Inherits="System.Web.Mvc.ViewPage<dynamic>" %>

<!DOCTYPE html>

<html>
<head runat="server">
  <meta name="viewport" content="width=device-width" />
  <title>Index</title>
</head>
<frameset cols="200,*" frameborder="1" bordercolor="#cccccc">
  <frame src="/Admin/Left" noresize />
  <frame src="/Admin/Main" name="main" />
</frameset>
</html>
(2)Left.aspx完整源码如下。
<%@ Page Language="C#" Inherits="System.Web.Mvc.ViewPage<dynamic>" %>
<!DOCTYPE html>
<html>
<head runat="server">
  <meta name="viewport" content="width=device-width" />
  <title>Left</title>
  <link href="/Content/AdminStyle.css" rel="stylesheet" />
  <script src="/Scripts/jquery-1.7.2.min.js"></script>
  <script>
    $(document).ready(function () {
       $(".title").click(function () {
          $(this).next().slideToggle();
       });
    });
  </script>
</head>
<body>
  <div style="width: 185px; padding-left: 5px; margin-left: 5px;">
    用户:<%=Request.Cookies["adminuser"].Value %><br />
    <div style="float: left; margin-right: 10px;"><a href="/
    Login/ChangePassword"
    target="main">修改口令</a></div>
    <div style="float: left">
       <a href="/Login/Exit" target="_top">退出系统</a>
    </div>
    <div style="clear: both"></div>
  </div>

  <div class="title">
    系统管理
  </div>
  <div class="item">
    <a href="/Config/UpdateConfig" target="main">系统参数设置</a><br />
    <a href="/Fix/ManageFix" target="main">设置固定信息</a><br />
  </div>
  <div class="title">
    新闻动态
  </div>
  <div class="item">
    <a href="/Class/AddClass/1" target="main">添加类别</a><br />
    <a href="/Class/ManageClass/1" target="main">管理类别</a><br />
    <a href="/Info/AddInfo/1" target="main">添加新闻</a><br />
    <a href="/Info/ManageInfo/1-0" target="main">管理新闻</a><br />
  </div>
  <div class="title">
    产品展示
  </div>
  <div class="item">
    <a href="/Class/AddClass/2" target="main">添加类别</a><br />
    <a href="/Class/ManageClass/2" target="main">管理类别</a><br />
    <a href="/Info/AddInfo/2" target="main">添加产品</a><br />
    <a href="/Info/ManageInfo/2-0" target="main">管理产品</a><br />
  </div>
  <div class="title">
    友情链接
  </div>
  <div class="item">
    <a href="/Friend/AddFriend/" target="main">添加友情链接</
a><br />
    <a href="/Friend/ManageFriend/" target="main">管理友情链接</a><br />
  </div>
</body>
</html>
在Left.aspx视图页面中,用到了jQuery中的代码来完成一个简单菜单展示效果,核心代码为:
  $(document).ready(function () {
    $(".title").click(function () {
       $(this).next().slideToggle();
    });
  });
其实目的就是当页面中的class=title的元素在被单击(click)后,就会执行“$(this).next().slideToggle();”代码来改变class=title这个元素的下一个元素(next)的显示状态(slideToggle)。其中“$(this).next()”就是选择当前元素的下一个元素,而“slideToggle”方法就是jQuery中的一个改变元素显示、隐藏的一个方法,即如果元素隐藏,执行“slideToggle”就会让元素显示出来,如果元素显示,执行“slideToggle”就会让元素隐藏起来。
(3)Main.aspx完整源码如下。
<%@ Page Language="C#" Inherits="System.Web.Mvc.ViewPage<dynamic>" %>
<!DOCTYPE html>
<html>
<head runat="server">
<meta name="viewport" content="width=device-width" />
<title>Main</title>
<link href="/Content/AdminStyle.css" rel="stylesheet" />
<script src="/Scripts/jquery-1.7.2.min.js"></script>
</head>
<body>
<table width="800" border="0" cellspacing="0" cellpadding="0"
style="border: 1px solid #09F;
margin: 5px;">
<tr>
<td height="30" colspan="3" class="auto-style2"
style="background-color: #09f;
color: #ffffff; text-align: center; font-weight: bold;">
企业宣传网站说明</td>
</tr>
<tr>
<td width="26" height="30"> </td>
<td width="147">系统数据库:</td>
<td width="627">SQL Server2008</td>
</tr>
<tr>
<td style="border-top: 1px solid #09F"> </td>
<td style="border-top: 1px solid #09F">开发语言:</td>
<td style="border-top: 1px solid #09F">C#</td>
</tr>
<tr>
<td style="border-top: 1px solid #09F"> </td>
<td style="border-top: 1px solid #09F">项目开发模式:</td>
<td style="border-top: 1px solid #09F">ASP.NET MVC
开发模式</td>
</tr>
<tr>
<td height="40" style="border-top: 1px solid #09F">
</td>
<td style="border-top: 1px solid #09F">系统功能说明:</td>
<td style="padding-left: 20px; border-top: 1px solid #09F">
<ul>
<1i>系统功能涉及新闻信息发布、产品发布、友情链接发
布。</li>
<li>其中新闻信息发布、产品发布都是分类别发布信息。</li>
<li>其中新闻信息发布、产品发布都是分类别发布信息。</li></>
<li>固定信息模块维护主要是维护单页面展示功能的实习,
比如:关于我们、联系我们、广告服务等。</li>
<1i>发布新闻信息、产品等都可以上传图片</li>
<li>详细内容页面采用Kindeditor在线编辑器,功能强
大,使用简捷。</li>
<li>Kindeditor在线编辑器可以单个图片上传,也可以
多图片批量上传。</li>
<1i>数据库存储后台账号和密码,其中密码存储使用md5
加密存储。</li>
<1i>系统默认后台登陆账号admin,口令也是admin,用户
登录成功后可以修改口令。</li>
<1i>友情链接模块,后台有上传logo功能,前台只是用名称
展示,用户可以自己修改前台的展示风格。</li>
</ul>
</td>
</tr>
<tr>
<td style="border-top: 1px solid #09F"> </td>
<td style="border-top: 1px solid #09F">技术交流QQ:</td>
<td style="border-top: 1px solid #09F; padding-left
: 20px;">2223793800</td>
</tr>
<tr>
<td style="border-top: 1px solid #09F"> </td>
<td style="border-top: 1px solid #09F">技术交流E-Mail:
</td>
<td style="border-top: 1px solid #09F; padding-left:
20px;">duankeqi@sohu.com
</td>
</tr>
</table>
</body>
</html>
可以看出,Main.aspx这个视图页面完全是个静态页面,主要是展示一些说明信息。
11.4.3 系统参数功能设置
系统参数功能设置,主要是用来设置网站中的公司名称、logo图片、seo搜索关键字、seo描述信息,信息保存在tb_config表中的对应字段中。页面预览如图11-27所示。

图11-27 系统参数功能设置-页面预览
可以看出是一个表单页面,当然用户在单击“确定修改”按钮时就需要一个方法来处理表单提交的信息。于是,设置一个ConfigController控制器,在其中设置两个方法,一个是表单展示;另一个当然就是表单提交要处理的方法,接下来给出ConfigController控制器的完整代码。
using System;
using System.Collections.Generic;
using System.Linq;
using System.Web;
using System.Web.Mvc;
using Company_MvcApplication.Models;
using System.Collections;

namespace Company_MvcApplication.Controllers
{
  public class ConfigController : Controller
  {
    //
    // GET: /Config/
    DBHelper db = new DBHelper();
    public ActionResult UpdateConfig()
    {
       if (!Common.IsLogin())
       {
          Response.Redirect("/Login/Login");
       }
       ViewBag.ConfigRow = db.GetRow("select top 1 compan
       y,logo,keywords,description from tb_config");
       return View();
    }
    public string DoUpdateConfig(string company, string logo,
    string keywords, string description)
    {
       if (!Common.IsLogin())
       {
          Response.Redirect("/Login/Login");
       }
       Hashtable ht = new Hashtable();
       ht.Add("@company",company);
       ht.Add("@logo",logo);
       ht.Add("@keywords",keywords);
       ht.Add("@description",description);
       string sql = "update tb_config set company=@company,
       logo=@logo,keywords=@keywords,description=@
       description";db.Execute(sql,ht);
       return "<script>alert('修改成功!');location.href='/
       Config/UpdateConfig'</script>";
    }
  }
}
其中的UpdateConfig方法返回一个视图,需要完成该视图的表单设计,同时该方法通过ViewBag把数据表tb_config中存储的参数信息通过DataRow传递到了UpdateConfig方法对应的视图UpdateConfig.aspx页面中,接下来给出视图UpdateConfig.aspx完整代码。
<%@ Page Language="C#" Inherits="System.Web.Mvc.ViewPage<dynamic>" %>
<!DOCTYPE html>
<html>
<head runat="server">
<meta name="viewport" content="width=device-width" />
<title>Index</title>
<link href="/Content/AdminStyle.css" rel="stylesheet" />
<script src="/Scripts/jquery-1.7.2.min.js"></script>
<link rel="stylesheet" href="/kindeditor-4.1.7/themes/
default/default.css" />
<script src="/kindeditor-4.1.7/kindeditor-min.js"></script>
<script>
KindEditor.ready(function (K) {
var uploadbutton = K.uploadbutton({
button: K('#uploadButton')[0],
fieldName: 'imgFile',
url: '/kindeditor-4.1.7/asp.net/upload_json.
ashx?dir=image',
afterUpload: function (data) {
if (data.error === 0) {
var url = K.formatUrl(data.url, 'absolute');
K('#logo').val(url);
K('#p').attr("src", url);
} else {
alert(data.message);
}
},
afterError: function (str) {
alert('自定义错误信息: ' + str);
}
});
uploadbutton.fileBox.change(function (e) {
uploadbutton.submit();
});
});
function check() {
if ($("#company").val() == "") {
alert("公司名称不能为空!");
$("#company").focus();
return false;
}
if ($("#logo").val() == "") {
alert("logo图片必须上传!");
$("#logo").focus();
return false;
}
if ($("#keywords").val() == "") {
alert("搜索关键字不能为空!");
$("#keywords").focus();
return false;
}
if ($("#description").val() == "") {
alert("搜索描述不能为空!");
$("#description").focus();
return false;
}
return true;
}
</script>
</head>
<body>
<form action="/Config/DoUpdateConfig" method="post" id="form1" name=
"form1" onsubmit="return check()">
<table width="800" border="0" cellspacing="0" cellpadding
="0" style="border: 1px solid #09F; margin: 5px;">
<tr>
<td height="30" colspan="4" class="auto-style2"
style="background-color: #09f; color: #ffffff;text
-align: center; font-weight: bold;">系统参数设置</td>
</tr>
<tr>
<td width="26" height="30"> </td>
<td width="163">公司名称</td>
<td width="609" colspan="2">
<input type="text" name="company" id="company"
class="txt" value=" <%:ViewBag.ConfigRow
["company"] %>" /></td>
</tr>
<tr>
<td height="60"> </td>
<td>公司Logo</td>
<td width="300" style="font-size: 12px; color: #f00">
<input type="button" id="uploadButton"value
="上传Logo图片" />(尺寸:164*51 大小<=2mb)
</td>
<td width="309" style="background-color: #eeeeee;
text-align: center;">
<input type="hidden" name="logo" id="logo"class
="txt" value="<%:ViewBag.ConfigRow["logo"] %>" />
<img src="<%:ViewBag.ConfigRow["logo"] %>"width
="164" height="51" id="p" style="cursor:
pointer;" onclick="window.open(this.src)
" title="Logo图片,单击查看原图" />
</td>
</tr>
<tr>
<td height="30"> </td>
<td>搜索关键字(Keywords)</td>
<td colspan="2">
<input type="text" name="keywords"id="
keywords" class="txt" value="<%:ViewBag.
ConfigRow["keywords"] %>" /></td>
</tr>
<tr>
<td height="30"> </td>
<td>搜索描述(Description)</td>
<td colspan="2">
<textarea id="description" name="description"
><%:ViewBag.ConfigRow ["description"]%></
textarea></td>
</tr>
<tr>
<td height="40"> </td>
<td> </td>
<td colspan="2">
<input type="submit" name="b1" id="b1" value
="确定修改" class="btn" />
<input type="reset" name="b2" id="b2" value="重置表单"
class="btn" />
</td>
</tr>
</table>
</form>
</body>
</html>
11.4.4 设置固定信息
设置固定信息,主要是针对网站系统中关于我们、联系我们等单页面固定信息的处理设置。不妨定义FixController控制器,在FixController控制器中定义ManageFix方法及其对应视图ManageFix.aspx来浏览所有固定信息标题,对应视图预览效果如图11-28所示。
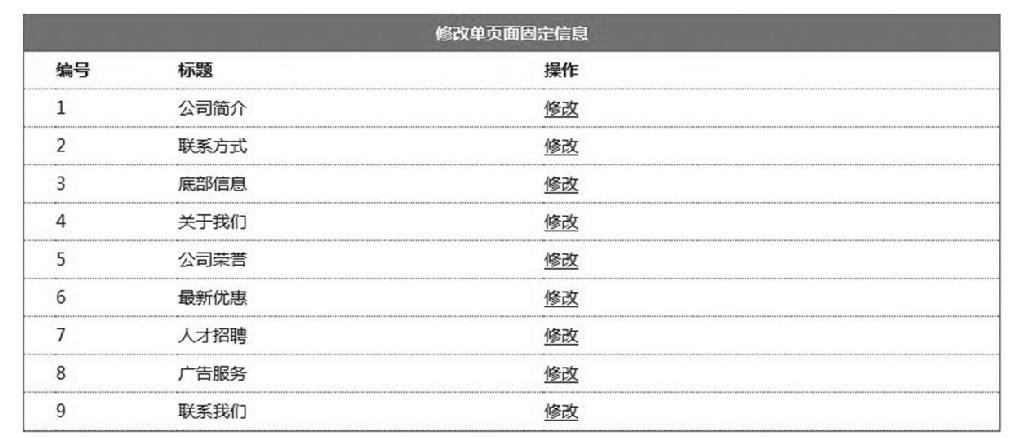
图11-28 ManageFix.aspx视图预览效果
而当用户单击其中“关于我们”所在行的“修改”,就需要展示一个表单页面,把数据库中的“关于我们”信息读到表单中,等待用户修改,这就需要定义UpdateFix方法及其对应视图UpdateFix.aspx来展示这个表单,对应视图预览效果如图11-29所示,当然控制器中还需要一个方法DoUpdateFix来完成表单提交数据的处理。
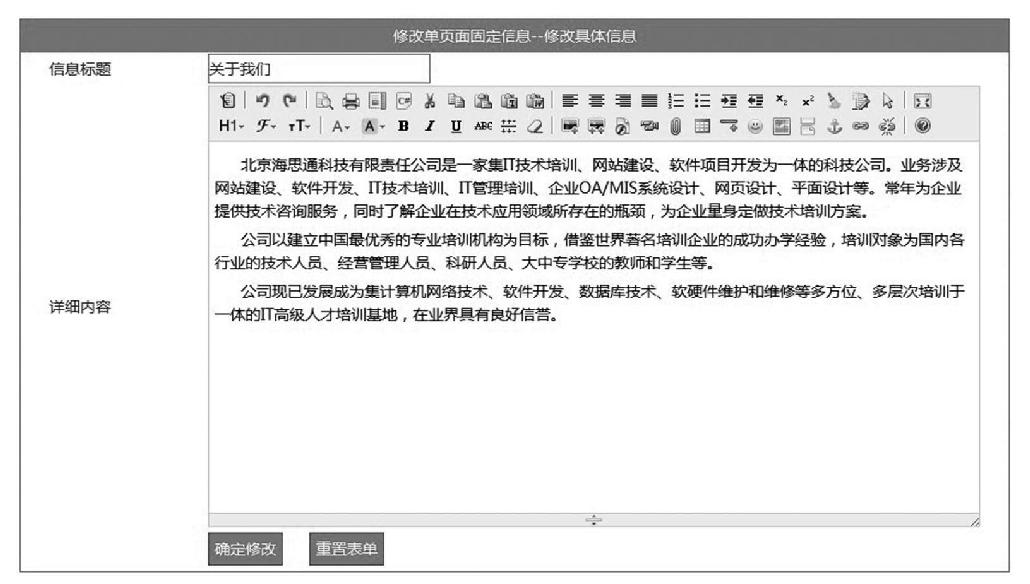
图11-29 UpdateFix.aspx视图预览效果
(1)FixController控制器完整代码如下。
using System;
using System.Collections.Generic;
using System.Linq;
using System.Web;
using System.Web.Mvc;
using Company_MvcApplication.Models;
using System.Collections;
namespace Company_MvcApplication.Controllers
{
  public class FixController : Controller
  {
    //
    // GET: /Fix/
    DBHelper db = new DBHelper();
    public ActionResult ManageFix()
    {
       if (!Common.IsLogin())
       {
          Response.Redirect("/Login/Login");
       }
       ViewBag.FixTable = db.GetTable("select id,title,content
       from tb_fix order by id asc");
       return View();
    }
    public ActionResult UpdateFix(int? id)
    {
       if (!Common.IsLogin())
       {
          Response.Redirect("/Login/Login");
       }
       if (id == null)
       {
          return RedirectToAction("ManageFix");
       }
       else
       {
          Hashtable ht = new Hashtable();
          ht.Add("@id", id);
          ViewBag.FixRow = db.GetRow("select id,title,content
            from tb_fix where id=@id", ht);
          return View();
       }
    }
    //下面的代码就是处理表单传值存在HTML标签系统验证不通过的问题,
    //这里设置false就是系统不用验证是否包含HTML标签
    [ValidateInput(false)]
    public string DoUpdateFix(int id,string title,string content)
    {
       if (!Common.IsLogin())
       {
          Response.Redirect("/Login/Login");
       }
       Hashtable ht = new Hashtable();
       ht.Add("@id",id);
       ht.Add("@title",title);
       ht.Add("@content",content);
       string sql = "update tb_fix set title=@title,content=@
       content where id=@id";
       db.Execute(sql,ht);
       return "<script>alert('修改成功!');location.href='/Fix/
       ManageFix';</script>";
    }
  }
}
(2)对应视图ManageFix.aspx完整代码如下。
<%@ Page Language="C#" Inherits="System.Web.Mvc.
ViewPage<dynamic>" %>
<!DOCTYPE html>
<html>
<head runat="server">
<meta name="viewport" content="width=device-width" />
<title>Index</title>
<link href="/Content/AdminStyle.css" rel="stylesheet" />
<script src="/Scripts/jquery-1.7.2.min.js"></script>
<script>
$(document).ready(function () {
$(".myrow").hover(function () {
$(this).css("background-color", "#eeeeee");
}, function () {
$(this).css("background-color", "#ffffff");
});
});
</script>
</head>
<body>
<table width="800" border="0" cellspacing="0" cellpadding
="0" style="border: 1px solid #09F; margin: 5px;">
<tr>
<td height="30" colspan="4" class="auto-style2"
style="background-color: #09f; color: #ffffff; textalign: center; font-weight: bold;">修改单页面固定信息</td>
</tr>
<tr>
<td width="26" height="30" style="border-bottom: 1px
dotted #09F; font-weight: bold;"> </td>
<td width="100" style="border-bottom: 1px dotted
#09F; font-weight: bold;">编号</td>
<td width="300" style="border-bottom: 1px dotted #09F;
font-weight: bold;">标题</td>
<td width="372" style="border-bottom: 1px dotted #09F;
font-weight: bold;">操作</td>
</tr>
<%
System.Data.DataTable table = ViewBag.FixTable;
for (int i = 0; i < table.Rows.Count; i++)
{
%>
<tr class="myrow">
<td height="30" style="border-bottom: 1px dotted #09F"
> </td>
<td style="border-bottom: 1px dotted #09F"><%:table.
Rows[i]["id"] %></td>
<td style="border-bottom: 1px dotted #09F"><%:table.
Rows[i]["title"] %></td>
<td style="border-bottom: 1px dotted #09F"><a href="/
Fix/UpdateFix/<%: table.Rows[i]["id"] %>">修改</a></td>
</tr>
<%
}
%>
</table>
</body>
</html>
(3)对应视图UpdateFix.aspx完整代码如下。
<%@ Page Language="C#" Inherits="System.Web.Mvc.ViewPage<dynamic
>" ValidateRequest="true" %>
<!DOCTYPE html>
<html>
<head runat="server">
<meta name="viewport" content="width=device-width" />
<title>UpdateFix</title>
<link href="/Content/AdminStyle.css" rel="stylesheet" />
<script src="/Scripts/jquery-1.7.2.min.js"></script>
<link rel="stylesheet" href="/kindeditor-4.1.7/themes/default
/default.css" />
<link rel="stylesheet" href="/kindeditor-4.1.7/plugins/code
/prettify.css" />
<script charset="utf-8" src="/kindeditor-4.1.7/kindeditor.js"
></script>
<script charset="utf-8" src="/kindeditor-4.1.7/lang/zh_CN.js
"></script>
<script charset="utf-8" src="/kindeditor-4.1.7/plugins/code/
prettify.js"></script>
<script>
KindEditor.ready(function (K) {
var editor1 = K.create('#content', {
cssPath:'/kindeditor-4.1.7/plugins/code/prettify.css',
uploadJson: '/kindeditor-4.1.7/asp.net/upload_
json.ashx',
fileManagerJson: '/kindeditor-4.1.7/asp.net/file_
manager_json.ashx',
allowFileManager: true
});
});
function check() {
if ($("#title").val() == "") {
alert("标题不能为空!");
$("#title").focus();
return false;
}
return true;
}
</script>
</head>
<body>
<form action="/Fix/DoUpdateFix" method="post" id="form1"name
="form1" onsubmit="return check()">
<input type="hidden" id="id" name="id" value="<%:ViewBag.
FixRow["id"] %>" />
<table width="900" border="0" cellspacing="0" cellpadding
="0" style="border: 1px solid #09F; margin: 5px;">
<tr>
<td height="30" colspan="3" class="auto-style2"
style="background-color: #09f; color: #ffffff;text
-align: center">修改单页面固定信息--修改具体信息</td>
</tr>
<tr>
<td width="26" height="30"> </td>
<td width="144">信息标题</td>
<td width="728">
<input type="text" id="title" name="title"
class="txt" value="<%:ViewBag.FixRow["title"]
%>" /></td>
</tr>
<tr>
<td height="30"> </td>
<td>详细内容</td></h5>
<td>
<textarea id="content" name="content" style
="width: 700px; height: 400px;"><%=ViewBag.
FixRow["content"] %></textarea></td>
</tr>
<tr>
<td height="40"> </td>
<td> </td>
<td>
<input type="submit" name="b1" id="b1" value
="确定修改" class="btn" />
<input type="reset" name="b2" id="b2" value="
重置表单" class="btn" />
</td>
</tr>
</table>
</form>
</body>
</html>
11.4.5 添加类别
由于系统中的类别分为信息类别和产品类别,而在tb_class表中,信息类别的parentid=1,产品类别的parentid=2,这样就可以通过传值来一次性完成信息类别和产品类别的添加功能。
添加类别功能,同样可以定义一个ClassController控制器,在ClassController控制器中定义AddClass方法及其对应视图AddClass.aspx来完成添加类别表单页面的实现,对应视图预览效果如图11-30所示。

图11-30 视图AddClass.aspx预览效果
当然还需要在ClassController控制器中增加一个方法DoAddClass方法来完成表单提交信息的处理。接下来给出ClassController控制器中AddClass方法和DoAddClass方法的完整代码。
public ActionResult AddClass(int id)
  {
    if (!Common.IsLogin())
    {
       Response.Redirect("/Login/Login");
    }
    Hashtable ht = new Hashtable();
    ht.Add("@id", id);
    string sql = "select classname from tb_class where classid
    =@id";
    ViewBag.ParentName = db.GetValue(sql, ht);
    ViewBag.ParentID = id;
    return View();
  }
  public string DoAddClass(int parentid,string classname,
  int sortid)
  {
    if (!Common.IsLogin())
    {
       Response.Redirect("/Login/Login");
    }
    Hashtable ht = new Hashtable();
    ht.Add("@parentid",parentid);
    ht.Add("@classname",classname);
    ht.Add("@sortid",sortid);
    string sql = "insert into tb_class(classname,sortid,
    parentid) values(@classname,@sortid,@parentid)";
    db.Execute(sql,ht);
    return "<script>alert('类别添加成功!');location.href='/
    Class/ManageClass/"+parentid+"';</script>";
  }
添加类别AddClass方法对应的视图AddClass.aspx完整代码如下。
<%@ Page Language="C#" Inherits="System.Web.Mvc.ViewPage<dynamic>"%>
<!DOCTYPE html>
<html>
<head runat="server">
<meta name="viewport" content="width=device-width" />
<title>AddClass</title>
<link href="/Content/AdminStyle.css" rel="stylesheet" />
<script src="/Scripts/jquery-1.7.2.min.js"></script>
<script>
function check() {
if ($("#classname").val() == "") {
alert("类别名称不能为空!");
$("#classname").focus();
return false;
}
if ($("#sortid").val() == "") {
alert("顺序号不能为空,且必须填写整数!");
$("#sortid").focus();
return false;
}
return true;
}
</script>
</head>
<body>
<form action="/Class/DoAddClass" method="post" id="form1" name=
"form1" onsubmit="return check()">
<input type="hidden" id="parentid" name="parentid" value="
<%:ViewBag.ParentID %>" />
<table width="800" border="0" cellspacing="0" cellpadding
="0" style="border: 1px solid #09F; margin: 5px;">
<tr>
<td height="30" colspan="3" style="background-color:
#09f; color: #ffffff; text-align: center; font-weight:
bold;">添加 [<%:ViewBag.ParentName %>] 类别信息</td>
</tr>
<tr>
<td width="27" height="30"> </td>
<td width="150">类别名称</td>
<td width="621">
<input type="text" id="classname" name="
classname" class="txt" /></td>
</tr>
<tr>
<td height="30"> </td>
<td>顺序号</td></h5>
<td>
<input type="text" id="sortid" name=" sortid"
class="txt" onkeyup="if (isNaN(value))
execCommand('undo')" onafterpaste="if(isNaN
(value))execCommand('undo')" /><span style=
"color: #f00; font-size: 12px;">注意:只能输入整数,
页面显示按照顺序号升序(从小到大)显示</span></td>
</tr>
<tr>
<td height="40"> </td>
<td> </td>
<td>
<input type="submit" id="b1" name="b1" value="
确认添加" class="btn" />
<input type="reset" id="b2" name="b2" value="
重置表单" class="btn" />
</td>
</tr>
</table>
</form>
</body>
</html>
11.4.6 管理类别
管理类别依然在ClassController控制器中完整相关方法及其视图的定义。首先需要增加一个浏览类别信息的方法,不妨就命名为ManageClass,对应视图ManageClass.aspx运行预览效果如图11-31所示。

图11-31 视图ManageClass.aspx运行预览效果
用户单击“公司动态”所在的行“修改”,依然需要一个表单页面来展示用户要修改的这条记录的信息,当然是个表单页面,可以在ClassController控制器中增加新的方法UpdateClass及其对应视图UpdateClass.aspx页面,对应视图UpdateClass.aspx运行预览效果如图11-32所示。

图11-32 视图UpdateClass.aspx运行预览效果
视图UpdateClass.aspx表单页面还需要一个提交信息处理方法DoUpdateClass来处理表单提交的数据。删除类别功能仅仅是一个行为方法,需要增加具体方法DeleteClass。ClassController控制器完整源码如下。
using System;
using System.Collections.Generic;
using System.Linq;
using System.Web;
using System.Web.Mvc;
using Company_MvcApplication.Models;
using System.Collections;

namespace Company_MvcApplication.Controllers
{
  public class ClassController : Controller
  {
    //
    // GET: /Class/
    DBHelper db = new DBHelper();
    public ActionResult AddClass(int id)
    {
       if (!Common.IsLogin())
       {
          Response.Redirect("/Login/Login");
       }
       Hashtable ht = new Hashtable();
       ht.Add("@id", id);
       string sql="select classname from tb_class where classid=@id";
       ViewBag.ParentName = db.GetValue(sql, ht);
       ViewBag.ParentID = id;
       return View();
    }

    public string DoAddClass(int parentid,string classname,int
    sortid)
    {
       if (!Common.IsLogin())
       {
          Response.Redirect("/Login/Login");
       }
       Hashtable ht = new Hashtable();
       ht.Add("@parentid",parentid);
       ht.Add("@classname",classname);
       ht.Add("@sortid",sortid);
       string sql = "insert into tb_class(classname,sortid,
       parentid) values (@classname,@sortid,@parentid)";
       db.Execute(sql,ht);
       return "<script>alert('类别添加成功!');location.href='
       /Class/ManageClass/"
       +parentid+"';</script>";
    }
    public string DeleteClass(int id)
    {
       if (!Common.IsLogin())
       {
          Response.Redirect("/Login/Login");
       }
       Hashtable ht = new Hashtable();
       ht.Add("@id", id);
       string sql = "select parentid from tb_class where classid
       =@id";
       string parentid = db.GetValue(sql, ht);
       sql ="delete from tb_class where classid=@id";
       db.Execute(sql,ht);
       return "<script>alert('类别删除成功!');location.href=
       '/Class/ManageClass/" + parentid + "';</script>";
    }
    public ActionResult UpdateClass(int id)
    {
       if (!Common.IsLogin())
       {
          Response.Redirect("/Login/Login");
       }
       Hashtable ht = new Hashtable();
       ht.Add("@id",id);
       string sql = "select classid,classname,sortid,parentid
       from tb_class where classid=@id";
       ViewBag.ClassRow = db.GetRow(sql,ht);
       sql = "select classname from tb_class where classid in
       (select parentid from tb_class where classid=@id)";
       ViewBag.ParentName = db.GetValue(sql,ht);
       return View();
    }

    public string DoUpdateClass(int classid,string classname,
    int sortid)
    {
       if (!Common.IsLogin())
       {
          Response.Redirect("/Login/Login");
       }
       Hashtable ht = new Hashtable();
       ht.Add("@classid",classid);
       ht.Add("@classname",classname);
       ht.Add("@sortid",sortid);
       string sql = "update tb_class set classname=@classname,
       sortid=@sortid where classid=@classid";
       db.Execute(sql,ht);

       ht = new Hashtable();
       ht.Add("@classid", classid);
       sql = "select parentid from tb_class where classid=@classid";
       string parentid = db.GetValue(sql, ht);
       return "<script>alert('类别修改成功!');location.href='/
       Class/ManageClass/" +
       parentid + "';</script>";
    }
    public ActionResult ManageClass(int id)
    {
       if (!Common.IsLogin())
       {
          Response.Redirect("/Login/Login");
       }
       string sql = "select classid,classname,sortid from tb_
       class where parentid=@id order
       by sortid asc";
       Hashtable ht = new Hashtable();
       ht.Add("@id", id);
       ViewBag.ClassTable = db.GetTable(sql,ht);
       sql = "select classname from tb_class where classid=@id";
       ViewBag.ParentName = db.GetValue(sql,ht);
       return View();
    }
  }
}
控制器ClassController中的ManageClass方法对应的视图ManageClass.aspx源码如下。
<%@ Page Language="C#" Inherits="System.Web.Mvc.ViewPage<dynamic>" %>
<!DOCTYPE html>
<html>
<head runat="server">
<meta name="viewport" content="width=device-width" />
<title>ManageClass</title>
<link href="/Content/AdminStyle.css" rel="stylesheet" />
<script src="/Scripts/jquery-1.7.2.min.js"></script>
<script>
$(document).ready(function () {
$(".myrow").hover(function () {
$(this).css("background-color", "#eeeeee");
}, function () {
$(this).css("background-color", "#ffffff");
});
});
</script>
</head>
<body>
<table width="800" border="0" cellspacing="0" cellpadding
="0" style="border: 1px solid #09F; margin: 5px;">
<tr>
<td height="30" colspan="5" style="background-color:
#09f; color: #ffffff; text-align: center; font-weight:bold;">
管理 [<%:ViewBag.ParentName %>] 类别信息</td>
</tr>
<tr>
<td width="20" height="30" style="border-bottom:1px
dotted #09F"> </td>
<td width="133" style="border-bottom:1px dotted
#09F">编号</td>
<td width="229" style="border-bottom:1px dotted
#09F">名称</td>
<td width="193" style="border-bottom:1px dotted
#09F">顺序号</td>
<td width="223" style="border-bottom:1px dotted
#09F">操作</td>
</tr>
<%
System.Data.DataTable table = ViewBag.ClassTable;
for (int i = 0; i < table.Rows.Count; i++)
{
%>
<tr class="myrow">
<td height="30" style="border-bottom:1px dotted #09F"
> </td>
<td style="border-bottom:1px dotted #09F"><%:table.Rows
[i]["classid"] %></td>
<td style="border-bottom:1px dotted #09F"><%:table.Rows
[i]["classname"] %></td>
<td style="border-bottom:1px dotted #09F"><%:table.Rows
[i]["sortid"] %></td>
<td style="border-bottom:1px dotted #09F">
<a href="/Class/UpdateClass/<%:table.Rows[i]
["classid"] %>">修改</a>
<a href="/Class/DeleteClass/<%:table.Rows[i]
["classid"] %>" onclick="return
confirm('确认删除吗?');">删除</a>
</td>
</tr>
<%
}
%>
</table>
</body>
</html>
控制器ClassController中的UpdateClass方法对应的视图UpdateClass.aspx源码如下。
<%@ Page Language="C#" Inherits="System.Web.Mvc.ViewPage<dynamic>" %>
<!DOCTYPE html>
<html>
<head runat="server">
<meta name="viewport" content="width=device-width" />
<title>UpdateClass</title>
<link href="/Content/AdminStyle.css" rel="stylesheet" />
<script src="/Scripts/jquery-1.7.2.min.js"></script>
<script>
function check() {
if ($("#classname").val() == "") {
alert("类别名称不能为空!");
$("#classname").focus();
return false;
}
if ($("#sortid").val() == "") {
alert("顺序号不能为空,且必须填写整数!");
$("#sortid").focus();
return false;
}
return true;
}
</script>
</head>
<body>
<form action="/Class/DoUpdateClass" method="post" id="form1" name=
"form1" onsubmit="return check()">
<input type="hidden" id="classid" name="classid" value
="<%:ViewBag.ClassRow["classid"] %>" />
<table width="800" border="0" cellspacing="0" cellpadding
="0" style="border: 1px solid #09F; margin: 5px;">
<tr>
<td height="30" colspan="3" style="background-color:
#09f; color: #ffffff; text-align: center; fontweight: bold;">修改 [<%:ViewBag.ParentName %>]
类别信息</td>
</tr>
<tr>
<td width="27" height="30"> </td>
<td width="150">类别名称</td>
<td width="621">
<input type="text" id="classname" name="
classname" class="txt" value="<%:ViewBag.
ClassRow["classname"] %>" /></td>
</tr>
<tr>
<td height="30"> </td>
<td>顺序号</td></h5>
<td>
<input type="text" id="sortid" name="sortid"
class="txt" onkeyup="if(isNaN(value))
execCommand('undo')" onafterpaste=" if(
isNaN(value))execCommand('undo')" value
="<%:ViewBag.ClassRow["sortid"] %>" /><span
style="color: #f00; font-size: 12px;">注意:
只能输入整数,页面显示按照顺序号升序(从小到大)显示
</span></td>
</tr>
<tr>
<td height="40"> </td>
<td> </td>
<td>
<input type="submit" id="b1" name="b1" value
="确认修改" class="btn" />
<input type="reset"id="b2" name="b2" value="重置表单"class="btn"/>
</td>
</tr>
</table>
</form>
</body>
</html>
11.4.7 添加新闻
由于系统中的添加新闻和添加产品都是添加到tb_info表中的,只是类别不同,所以依然可以通过传递parentid值来确认到底是添加新闻信息还是添加产品信息。具体添加新闻信息功能,同样可以定义一个InfoController控制器,在InfoController控制器中定义AddInfo方法及其对应视图AddInfo.aspx来完成添加新闻信息表单页面的实现,对应视图预览效果如图11-33所示。另外还需要创建一个Add Info.aspx视图表单的提交处理方法DoAdd-Info。
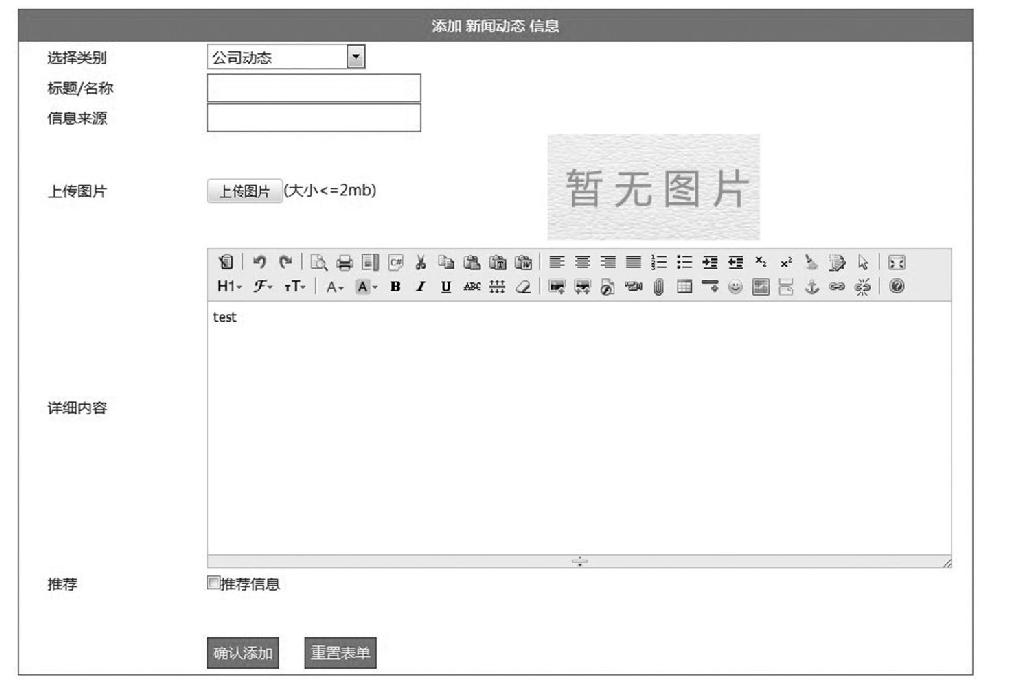
图11-33 视图AddInfo.aspx预览效果
接下来给出InfoController控制器中的AddInfo方法、DoAddInfo方法的完整代码。
public ActionResult AddInfo(int id)
  {
    Hashtable ht = new Hashtable();
    ht.Add("@id",id);
    string sql = "select classid,classname from tb_class
    where parentid=@id order by sortid asc";
    ViewBag.ClassTable = db.GetTable(sql,ht);
    sql = "select classname from tb_class where classid=@id";
    ViewBag.ParentName = db.GetValue(sql,ht);
    return View();
  }
  [ValidateInput(false)]
  public string DoAddInfo(int classid, string title, string
  author, string pic, string content, int? mode)
  {
    if (mode == null) mode = 0;
    Hashtable ht = new Hashtable();
    ht.Add("@classid",classid);
    ht.Add("@title",title);
    ht.Add("@author",author);
    ht.Add("@pic",pic);
    ht.Add("@content",content);
    ht.Add("@mode",mode);
    string sql = "insert into tb_info(classid,title,author,
    pic,content,mode) values(@classid,@title,@author,@pic,
    @content,@mode)";
    db.Execute(sql,ht);

    ht = new Hashtable();
    ht.Add("@classid", classid);
    sql = "select parentid from tb_class where classid=
    @classid";
    string parentid = db.GetValue(sql,ht);
    return "<script>alert('添加成功!');location.href='/Info/
    ManageInfo/" + parentid + "-"+classid.ToString ()+"';
    </script>";

  }
视图AddInfo.aspx的完整源码如下。
<%@ Page Language="C#" Inherits="System.Web.Mvc.ViewPage
<dynamic>" %>
<!DOCTYPE html>
<html>
<head runat="server">
<meta name="viewport" content="width=device-width" />
<title>AddInfo</title>
<link href="/Content/AdminStyle.css" rel="stylesheet" />
<script src="/Scripts/jquery-1.7.2.min.js"></script>
<link rel="stylesheet" href="/kindeditor-4.1.7/themes/
default/default.css" />
<link rel="stylesheet" href="/kindeditor-4.1.7/plugins/
code/prettify.css" />
<script charset="utf-8" src="/kindeditor-4.1.7/kindeditor.
js"></script>
<script charset="utf-8" src="/kindeditor-4.1.7/lang/zh_
CN.js"></script>
<script charset="utf-8" src="/kindeditor-4.1.7/plugins/
code/prettify.js"></script>
<script>
KindEditor.ready(function (K) {
var editor1 = K.create('#content', {
cssPath: '/kindeditor-4.1.7/plugins/code/
prettify.css',
uploadJson: '/kindeditor-4.1.7/asp.net/upload_
json.ashx',
fileManagerJson: '/kindeditor-4.1.7/asp.net/file_
manager_json.ashx',
allowFileManager: true
});
});
KindEditor.ready(function (K) {
var uploadbutton = K.uploadbutton({
button: K('#uploadButton')[0],
fieldName: 'imgFile',
url: '/kindeditor-4.1.7/asp.net/upload_json.
ashx?dir=image',
afterUpload: function (data) {
if (data.error === 0) {
var url = K.formatUrl(data.url, 'absolute');
K('#pic').val(url);
K('#p').attr("src", url);
} else {
alert(data.message);
}
},
afterError: function (str) {
alert('自定义错误信息: ' + str);
}
});
uploadbutton.fileBox.change(function (e) {
uploadbutton.submit();
});
});
function check() {
if ($("#title").val() == "") {
alert("标题不能为空!");
$("#title").focus();
return false;
}
return true;
}
</script>
</head>
<body>
<form action="/Info/DoAddInfo" method="post" id="form1" name=
"form1" onsubmit="return check()">
<table width="900" border="0" cellspacing="0" cellpadding
="0" style="border: 1px solid #09F; margin: 5px;">
<tr>
<td height="30" colspan="4" style="background-color:
#09f; color: #ffffff; text-align: center; font-weight:
bold;">添加 <%:ViewBag.ParentName %> 信息</td>
</tr>
<tr>
<td width="27" height="30"> </td>
<td width="150">选择类别</td>
<td width="721" colspan="2">
<select id="classid" name="classid">
<%
System.Data.DataTable table = ViewBag.
ClassTable;
foreach (System.Data.DataRow row in
table.Rows)
{
Response.Write("<option value='"
+ row["classid"] + "'>" + row
["classname"] + "</option>");
}
%>
</select>
</td>
</tr>
<tr>
<td> </td>
<td>标题/名称</td>
<td colspan="2">
<input type="text" id="title" name="title"
class="txt" /></td>
</tr>
<tr>
<td height="30"> </td>
<td>信息来源</td></h5>
<td colspan="2">
<input type="text" id="author" name="author"
class="txt" /></td>
</tr>
<tr>
<td height="30"> </td>
<td>上传图片</td>
<td width="321">
<input type="button" id="uploadButton" value
="上传图片" />(大小<=2mb)
</td>
<td width="400">
<input type="hidden" name="pic" id="pic"class
="txt" value="/Content/Images/nopic.jpg" />
<img src="/Content/Images/nopic.jpg" onload=
"if (this.width>200) this.width=200; if (this.
heigt>200) this.heigt=200;" id="p" style="
cursor: pointer;" onclick="window.open(this.
src)" title="单击查看原图" />
</td>
</tr>
<tr>
<td height="30"> </td>
<td>详细内容</td>
<td colspan="2">
<textarea id="content" name="content" style=
"width: 700px; height: 300px;">test</textarea>
</td>
</tr>
<tr>
<td height="30"> </td>
<td>推荐</td>
<td colspan="2">
<input type="checkbox" id="mode" name=
"mode" value="1" />推荐信息
</td>
</tr>
<tr>
<td height="30"> </td>
<td> </td>
<td colspan="2"> </td>
</tr>
<tr>
<td height="40"> </td>
<td> </td>
<td colspan="2">
<input type="submit" id="b1" name="b1" value=
"确认添加" class="btn" />
<input type="reset" id="b2" name="b2"
value="重置表单" class="btn" />
</td>
</tr>
</table>
</form>
</body>
</html>
11.4.8 管理新闻
管理新闻依然在InfoController控制器中完成相关方法及其视图的定义。首先需要增加一个浏览新闻信息的方法,不妨就命名为ManageInfo,对应视图ManageInfo.aspx运行预览效果如图11-34所示。
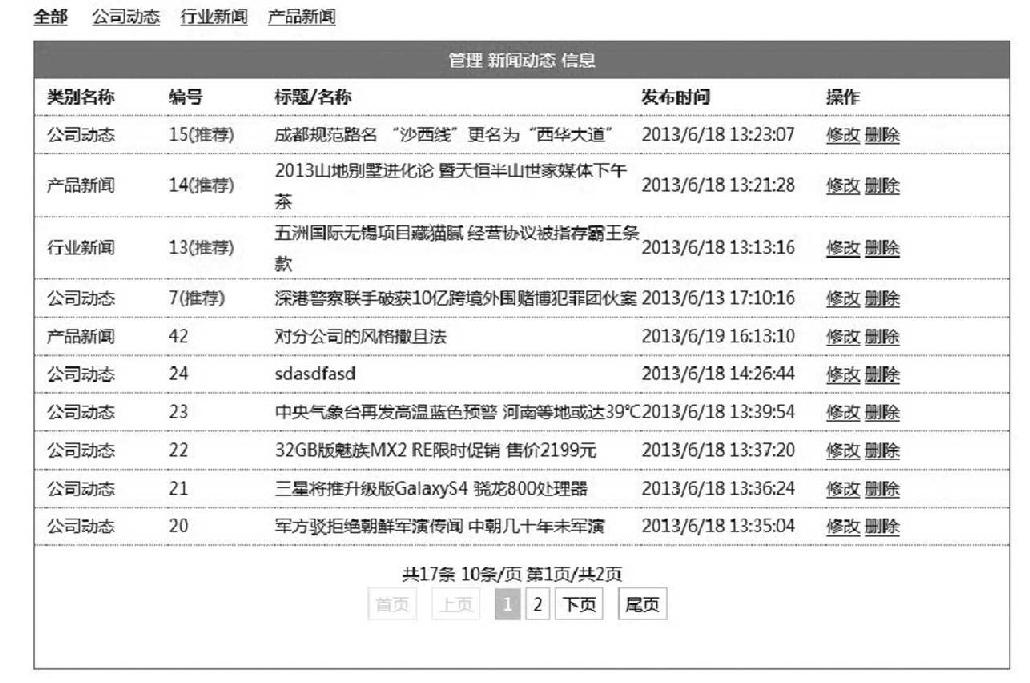
图11-34 视图ManageInfo.aspx运行预览效果
用户单击某条信息后面的“修改”链接,依然需要一个表单页面来展示用户要修改的这条记录的信息,当然是个表单页面,可以在InfoController控制器中增加新的方法UpdateInfo及其对应视图UpdateInfo.aspx页面,对应视图UpdateInfo.aspx运行预览效果如图11-35所示。
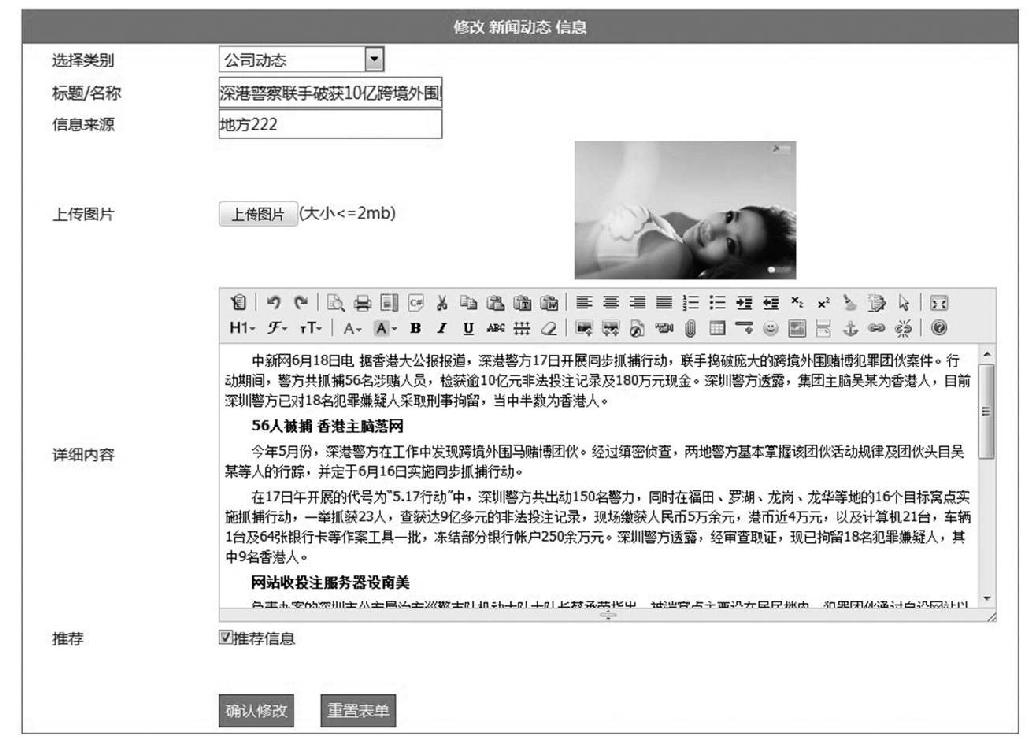
图11-35 视图UpdateInfo.aspx运行预览效果
视图UpdateInfo.aspx表单页面还需要一个提交信息处理方法DoUpdateInfo来处理表单提交的数据。删除信息功能仅仅是一个行为方法,需要增加具体方法DeleteInfo即可。InfoController控制器完整源码如下。
using System;
using System.Collections.Generic;
using System.Linq;
using System.Web;
using System.Web.Mvc;
using Company_MvcApplication.Models;
using System.Collections;
namespace Company_MvcApplication.Controllers
{
  public class InfoController : Controller
  {
    //
    // GET: /Info/
    DBHelper db = new DBHelper();
    public ActionResult ManageInfo(int parentid, int classid)
    {
       Hashtable ht = new Hashtable();
       string sql = "";
       if (classid == 0)
       {
          ht.Add("@parentid", parentid);
          sql = "select a.id,a.title,a.dt,a.mode,b.classname
          from tb_info a,tb_class b where a.classid=b.classid
          and a.classid in(select classid from tb_class where
          parentid=@parentid) order by mode desc,dt desc";
       }
       else
       {
          ht.Add("@classid", classid);
          sql = "select a.id,a.title,a.dt,a.mode,b.classname
          from tb_info a,tb_class b where a.classid=b.classid
          and a.classid = @classid order by mode desc,dt desc";
       }
       ViewBag.InfoTable = db.GetTable(sql, ht);
       ht = new Hashtable();
       ht.Add("@parentid", parentid);
       sql = "select classname from tb_class where classid
       =@parentid";
       ViewBag.ParentName = db.GetValue(sql,ht);

       sql = "select classid,classname,sortid from tb_class
       where parentid=@parentid order by sortid asc";
       ViewBag.ClassTable = db.GetTable(sql,ht);
       ViewBag.ParentID = parentid;
       ViewBag.ClassID = classid;
       return View();
  }
  public ActionResult AddInfo(int id)
  {
    Hashtable ht = new Hashtable();
    ht.Add("@id",id);
    string sql = "select classid,classname from tb_class
    where parentid=@id order by sortid asc";
    ViewBag.ClassTable = db.GetTable(sql,ht);
    sql = "select classname from tb_class where classid=@id";
    ViewBag.ParentName = db.GetValue(sql,ht);
    return View();
  }
  [ValidateInput(false)]
  public string DoAddInfo(int classid, string title, string
  author, string pic, string content, int? mode)
  {
    if (mode == null) mode = 0;
    Hashtable ht = new Hashtable();
    ht.Add("@classid",classid);
    ht.Add("@title",title);
    ht.Add("@author",author);
    ht.Add("@pic",pic);
    ht.Add("@content",content);
    ht.Add("@mode",mode);
    string sql = "insert into tb_info(classid,title,
    author,pic,content,mode) values(@classid,@title,@
    author,@pic,@content,@mode)";
    db.Execute(sql,ht);

    ht = new Hashtable();
    ht.Add("@classid", classid);
    sql = "select parentid from tb_class where classid=@
    classid";
    string parentid = db.GetValue(sql,ht);
    return "<script>alert('添加成功!');location.href='/
    Info/ManageInfo/" + parentid + "-"+classid.ToString
    ()+"';</script>";
  }
  public string DeleteInfo(int id)
  {
    //首先获取这个info中id的classid的parentid
    Hashtable ht = new Hashtable();
    ht.Add("@id",id);
    string sql = "select parentid from tb_class where
    classid in(select classid from tb_info where id=@id)";
    string parentid = db.GetValue(sql,ht);
    sql = "select classid from tb_info where id=@id";
    string classid = db.GetValue(sql,ht);
    sql = "delete from tb_info where id=@id";
    db.Execute(sql,ht);
    return "<script>alert('删除成功!');location.href='/
    Info/ManageInfo/" + parentid + "-"+classid+"';</script>";
  }
  public ActionResult UpdateInfo(int id)
  {
    Hashtable ht = new Hashtable();
    ht.Add("@id", id);
    //首先取出该info的类别表信息
    string sql = "select classid,classname from tb_class where
    parentid in(select parentid from tb_class where classid
    in(select classid from tb_info where id=@id))";
    ViewBag.ClassTable = db.GetTable(sql,ht);

    //获取parentname
    sql = "select classname from tb_class where classid in
    (select parentid from tb_class where classid in(select
    classid from tb_info where id=@id))";
    ViewBag.ParentName = db.GetValue(sql,ht);
    //取出id这条信息行InfoRow
    sql = "select id,title,author,content,classid,pic,mode
    from tb_info where id=@id";
    ViewBag.InfoRow = db.GetRow(sql,ht);
    return View();
  }
  [ValidateInput(false)]
  public string DoUpdateInfo(int id,int classid, string
  title, string author, string pic, string content, int? mode)
  {
    if (mode == null) mode = 0;
    Hashtable ht = new Hashtable();
    ht.Add("@id",id);
    ht.Add("@classid", classid);
    ht.Add("@title", title);
    ht.Add("@author", author);
    ht.Add("@pic", pic);
    ht.Add("@content", content);
    ht.Add("@mode", mode);
    string sql = "update tb_info set classid=@classid,
    title=@title,author=@author,pic=@pic,content=@
    content,mode=@mode where id=@id";
    db.Execute(sql, ht);

    ht = new Hashtable();
    ht.Add("@classid", classid);
    sql = "select parentid from tb_class where classid
    =@classid";
    string parentid = db.GetValue(sql, ht);
    return "<script>alert('修改成功!');location.href='/Info/
    ManageInfo/" + parentid + "-"+classid.ToString ()+"';</
    script>";
    }
  }
}
控制器InfoController中的ManageInfo方法对应的视图ManageInfo.aspx完整代码如下。
<%@ Page Language="C#" Inherits="System.Web.Mvc.ViewPage<dynamic>" %>
<%@ Import Namespace="Company_MvcApplication.Models" %>
<!DOCTYPE html>
<html>
<head runat="server">
<meta name="viewport" content="width=device-width" />
<title>ManageInfo</title>
<link href="/Content/AdminStyle.css" rel="stylesheet" />
<script src="/Scripts/jquery-1.7.2.min.js"></script>
<script>
$(document).ready(function () {
$(".myrow").hover(function () {
$(this).css("background-color", "#eeeeee");
}, function () {
$(this).css("background-color", "#ffffff");
});
});
</script>
</head>
<body>
<%
int classid = ViewBag.ClassID;
int parentid = ViewBag.ParentID;
%>
<table width="800" border="0" cellspacing="0" cellpadding
="0" style="border: 0px solid #09F; margin: 5px;">
<tr>
<td height="30">
<a href="/Info/ManageInfo/<%:parentid %>-0"style
="font-weight: <%:classid==0?"bold":"normal"%>;
">全部</a>
<%
System.Data.DataTable classTable = ViewBag.
ClassTable;
for (int i = 0; i < classTable.Rows.Count; i++)
{
if (classid.ToString() == classTable.
Rows[i]["classid"].ToString())
{
Response.Write("<a style='font-
weight: bold;' href='/Info/ManageInfo/"
+ parentid.ToString() + "-" + class
Table.Rows[i]["classid"].ToString()
+ "'>" + classTable.Rows[i]
["classname"].ToString() + "</
a> ");
}
else
{
Response.Write("<a style='font-
weight: normal;' href='/Info/
ManageInfo/" + parentid.ToString() +
"-" + classTable.Rows[i]["classid"].
ToString() + "'>" + classTable.
Rows[i]["classname"].ToString() +
"</a> ");
}
}
%>
</td>
</tr>
</table>
<table width="800" border="0" cellspacing="0" cellpadding
="0" style="border: 1px solid #09F; margin: 5px;">
<tr>
<td height="30" colspan="6" style="background-color:
#09f; color: #ffffff; text-align: center; font-weight:
bold;">管理 <%:ViewBag.ParentName %> 信息</td>
</tr>
<tr>
<td width="10" height="30" style="border-bottom:
1px dotted #09F; font-weight: bold;"> </td>
<td width="100" style="border-bottom: 1px dotted
#09F; font-weight: bold;">类别名称</td>
<td width="87" style="border-bottom: 1px dotted
#09F; font-weight: bold;">编号</td>
<td width="300" style="border-bottom: 1px dotted
#09F; font-weight: bold;">标题/名称</td>
<td width="151" style="border-bottom: 1px dotted
#09F; font-weight: bold;">发布时间</td>
<td width="150" style="border-bottom: 1px dotted
#09F; font-weight: bold;">操作</td>
</tr>
<%
System.Data.DataTable table = ViewBag.InfoTable;
int recordcount = table.Rows.Count;
int pagesize = 10;
int pagecount = Convert.ToInt32(Math.Ceiling(Convert
.ToDouble(recordcount) / Convert.ToDouble(pagesize)));
string pagestring = Request.QueryString["page"];
int page = Common.GetPage(pagestring, pagecount);
int startindex = (page - 1) * pagesize;
int endindex = pagesize * page - 1;
if (endindex >=recordcount - 1)endindex=recordcount -1;
int minpageno = 5;//最少页号个数 起始页号数
int maxpageno = 10;//最多页号个数
int endpageno;
int startpageno = Common.GetStartPageno(minpageno,
maxpageno, pagecount, page, out endpageno);
for (int i = startindex; i <= endindex; i++)
{
%>
<tr class="myrow">
<td height="30" style="border-bottom: 1px dotted
#09F;"> </td>
<td style="border-bottom: 1px dotted #09F;"><%:table
.Rows[i]["classname"] %></td>
<td style="border-bottom: 1px dotted #09F;"><%:table.
Rows[i]["id"] %><%=table.Rows[i]["mode"].
ToString()=="1"?"<span style='color:#ff0000'>(推荐)
</span>":"" %></td>
<td style="border-bottom: 1px dotted #09F;">
<%:table.Rows[i]["title"] %></td>
<td style="border-bottom: 1px dotted #09F;">
<%:table.Rows[i]["dt"] %></td>
<td style="border-bottom: 1px dotted #09F;">
<a href="/Info/UpdateInfo/<%:table.Rows[i]
["id"] %>" target="main">修改</a>
<a href="/Info/DeleteInfo/<%:table.Rows[i]["id"] %>"
onclick="return confirm('确认删除吗?');">删除</a>
</td>
</tr>
<%
}
%>
<tr>
<td height="30" colspan="6" style="text-align:
center; line-height: 30px;">
<% Common.ShowPage(recordcount, pagesize, page,
pagecount, startpageno, endpageno, "?");%>
</td>
</tr>
</table>
</body>
</html>
由于ManageInfo.aspx视图页面涉及分页显示数据功能,所以页面代码比较多,具体数据分页代码详细解释可以参见10.10节。
控制器InfoController中的UpdateInfo方法对应的视图UpdateInfo.aspx完整代码如下。
<%@ Page Language="C#" Inherits="System.Web.Mvc.ViewPage<dynamic>" %>
<!DOCTYPE html>
<html>
<head runat="server">
<meta name="viewport" content="width=device-width" />
<title>UpdateInfo</title>
<link href="/Content/AdminStyle.css" rel="stylesheet" />
<script src="/Scripts/jquery-1.7.2.min.js"></script>
<link rel="stylesheet" href="/kindeditor-4.1.7/themes/
default/default.css" />
<link rel="stylesheet" href="/kindeditor-4.1.7/plugins/
code/prettify.css" />
<script charset="utf-8" src="/kindeditor-4.1.7/kindeditor.
js"></script>
<script charset="utf-8" src="/kindeditor-4.1.7/lang/zh_
CN.js"></script>
<script charset="utf-8" src="/kindeditor-4.1.7/plugins/
code/prettify.js"></script>
<script>
KindEditor.ready(function (K) {
var editor1 = K.create('#content', {
cssPath: '/kindeditor-4.1.7/plugins/code/prettify.css',
uploadJson: '/kindeditor-4.1.7/asp.net/upload_json.ashx',
fileManagerJson: '/kindeditor-4.1.7/asp.net/file_
manager_json.ashx',
allowFileManager: true
});
});
KindEditor.ready(function (K) {
var uploadbutton = K.uploadbutton({
button: K('#uploadButton')[0],
fieldName: 'imgFile',
url: '/kindeditor-4.1.7/asp.net/upload_json.
ashx?dir=image',
afterUpload: function (data) {
if (data.error === 0) {
var url = K.formatUrl(data.url, 'absolute');
K('#pic').val(url);
K('#p').attr("src", url);
} else {
alert(data.message);
}
},
afterError: function (str) {
alert('自定义错误信息: ' + str);
}
});
uploadbutton.fileBox.change(function (e) {
uploadbutton.submit();
});
});
function check() {
if ($("#title").val() == "") {
alert("标题不能为空!");
$("#title").focus();
return false;
}
return true;
}
</script>
</head>
<body>
<% System.Data.DataRow inforow = ViewBag.InfoRow; %>
<form action="/Info/DoUpdateInfo" method="post" id="form1"
name="form1" onsubmit="return check()">
<input type="hidden" id="id" name="id" value=
"<%:inforow["id"] %>" />
<table width="900" border="0" cellspacing="0" cellpadding
="0" style="border: 1px solid #09F; margin: 5px;">
<tr>
<td height="30" colspan="4" style="background-color:
#09f; color: #ffffff; text-align: center;font-
weight: bold;">修改 <%:ViewBag.ParentName %> 信息</td>
</tr>
<tr>
<td width="27" height="30"> </td>
<td width="150">选择类别</td>
<td width="721" colspan="2">
<select id="classid" name="classid">
<%
System.Data.DataTable table = ViewBag.
ClassTable;
foreach (System.Data.DataRow row in
table.Rows)
{
if (inforow["classid"].ToString
() == row["classid"].ToString())
{
Response.Write("<option value
='" + row["classid"] + "' selected
>" + row["classname"] + "</
option>");
}
else
{
Response.Write("<option value
='" + row["classid"] + "'>" +
row["classname"]+"</option>");
}
}
%>
</select>
</td>
</tr>
<tr>
<td> </td>
<td>标题/名称</td>
<td colspan="2">
<input type="text" id="title" name="title" class
="txt" value="<%:inforow["title"] %>" /></td>
</tr>
<tr>
<td height="30"> </td>
<td>信息来源</td>
<td colspan="2">
<input type="text" id="author" name="author"
class="txt" value="<%:inforow["author"] %>"
/></td>
</tr>
<tr>
<td height="30"> </td>
<td>上传图片</td></[>
<td width="321">
<input type="button" id="uploadButton"
value="上传图片" />(大小<=2mb)
</td>
<td width="400">
<input type="hidden" name="pic" id="pic"
class="txt" value="<%:inforow["pic"] %>" />
<img src="<%:inforow["pic"] %>" onload="if
(this.width>200) this.width=200; if (this.heigt
>200) this.heigt=200;" id="p" style="cursor:
pointer;" onclick="window.open(this.src)"
title="单击查看原图" />
</td>
</tr>
<tr>
<td height="30"> </td>
<td>详细内容</td>
<td colspan="2">
<textarea id="content" name="content" style=
"width: 700px; height: 300px;"><%:inforow
["content"] %></textarea>
</td>
</tr>
<tr>
<td height="30"> </td>
<td>推荐</td>
<td colspan="2">
<input type="checkbox" id="mode" name="mode"
value="1" <%:inforow["mode"].ToString ()=
="1"?"checked":"" %> />推荐信息
</td>
</tr>
<tr>
<td height="30"> </td>
<td> </td>
<td colspan="2"> </td>
</tr>
<tr>
<td height="40"> </td>
<td> </td>
<td colspan="2">
<input type="submit" id="b1" name="b1"
value="确认修改" class="btn" />
<input type="reset" id="b2" name="b2"
value="重置表单" class="btn" />
</td>
</tr>
</table>
</form>
</body>
</html>
11.4.9 添加友情链接
添加友情链接功能的实现和添加类别功能类似,直接创建一个FriendController控制器,在其中增加一个AddFriend方法及其视图表单页面AddFriend.aspx,视图表单页面AddFriend.aspx运行预览效果如图11-36所示。

图11-36 视图表单页面AddFriend.aspx运行预览效果
然后再给FriendController控制器增加一个表单提交处理的方法DoAddFriend。接下来给出FriendController控制器中AddFriend方法、DoAddFriend方法的完整代码。
public ActionResult AddFriend()
       {
          if (!Common.IsLogin())
          {
              Response.Redirect("/Login/Login");
          }
          return View();
       }
          public string DoAddFriend(string title,string url, string
          pic,int sortid)
       {
          if (!Common.IsLogin())
          {
              Response.Redirect("/Login/Login");
          }
          Hashtable ht = new Hashtable();
          ht.Add("@title",title);
          ht.Add("@url",url);
          ht.Add("@pic",pic);
          ht.Add("@sortid",sortid);

          string sql = "insert into tb_friend(title, url,pic,
          sortid) values(@title,@url,@pic,@sortid)";
          db.Execute(sql,ht);
          return "<script>alert('信息添加成功!');location.href=
          '/Friend/ManageFriend/';</script>";
       }
在FriendController控制器中AddFriend方法对应的视图AddFriend.aspx完整代码如下。
<%@ Page Language="C#" Inherits="System.Web.Mvc.ViewPage<dynamic>" %>
<!DOCTYPE html>
<html>
<head runat="server">
<meta name="viewport" content="width=device-width" />
<title>AddFriend</title>
<link href="/Content/AdminStyle.css" rel="stylesheet" />
<script src="/Scripts/jquery-1.7.2.min.js"></script>
<link rel="stylesheet" href="/kindeditor-4.1.7/themes/
default/default.css" />
<link rel="stylesheet" href="/kindeditor-4.1.7/plugins/
code/prettify.css" />
<script charset="utf-8" src="/kindeditor-4.1.7/kindeditor.
js"></script>
<script charset="utf-8" src="/kindeditor-4.1.7/lang/zh_
CN.js"></script>
<script charset="utf-8" src="/kindeditor-4.1.7/plugins/
code/prettify.js"></script>
<script>
KindEditor.ready(function (K) {
var uploadbutton = K.uploadbutton({
button: K('#uploadButton')[0],
fieldName: 'imgFile',
url: '/kindeditor-4.1.7/asp.net/upload_json.
ashx?dir=image',
afterUpload: function (data) {
if (data.error === 0) {
var url = K.formatUrl(data.url, 'absolute');
K('#pic').val(url);
K('#p').attr("src", url);
} else {
alert(data.message);
}
},
afterError: function (str) {
alert('自定义错误信息: ' + str);
}
});
uploadbutton.fileBox.change(function (e) {
uploadbutton.submit();
});
});
function check() {
if ($("#title").val() == "") {
alert("名称不能为空!");
$("#title").focus();
return false;
}
if ($("#url").val() == "") {
alert("网址不能为空!");
$("#url").focus();
return false;
}
if ($("#sortid").val() == "") {
alert("顺序号不能为空!");
$("#sortid").focus();
return false;
}
return true;
}
</script>
</head>
<body>
<form action="/Friend/DoAddFriend" method="post" id="form1"
name="form1" onsubmit="return check()">
<table width="900" border="0" cellspacing="0" cellpadding=
"0" style="border: 1px solid #09F; margin: 5px;">
<tr>
<td height="30" colspan="4" style="background-
color: #09f; color: #ffffff; text-align: center;
font-weight: bold;">添加 友情链接 信息</td>
</tr>
<tr>
<td height="30" > </td>
<td>名称</td>
<td colspan="2">
<input type="text" id="title" name="title"
class="txt" /></td>
</tr>
<tr>
<td height="30"> </td>
<td>Logo图片</td>
<td width="321">
<input type="button" id="uploadButton"
value="上传图片" />(大小<=2mb)
</td>
<td width="400">
<input type="hidden" name="pic" id="pic" class
="txt" value="/Content/Images/nopic.jpg" />
<img src="/Content/Images/nopic.jpg" onload
="if (this.width>200) this.width=200; if
(this.heigt>200) this.heigt=200;" id="p"
style="cursor: pointer;" onclick="window.
open(this.src)" title="单击查看原图" />
</td>
</tr>
<tr>
<td class="auto-style1"></td>
<td class="auto-style1">网址</td>
<td class="auto-style1">
<input type="text" id="url" name="url" class
="txt" value="http://" /></td>
<td style ="font-size:12px; color:#ff0000;" class
="auto-style1">注:以http://开头,比如:http://www.
haisitong.com/</td>
</tr>
<tr>
<td height="30"> </td>
<td>顺序号</td>
<td>
<input type="text" id="sortid" name="sortid"
class="txt" value="100" onkeyup="if(isNaN
(value))execCommand('undo')" onafterpaste ="
if(isNaN(value))execCommand('undo')" /></td>
<td style ="font-size:12px; color:#ff0000;">注:
只能填写整数,升序显示</td>
</tr>
<tr>
<td height="40"> </td>
<td> </td>
<td colspan="2">
<input type="submit" id="b1" name="b1" value
="确认添加" class="btn" />
<input type="reset" id="b2" name="b2" value
="重置表单" class="btn" />
</td>
</tr>
</table>
</form>
</body>
</html>
11.4.10 管理友情链接
管理友情链接依然在FriendController控制器增加一个ManageFriend方法及其对应视图ManageFriend.aspx来显示已经添加的友情链接信息,视图ManageFriend.aspx预览效果如图11-37所示。
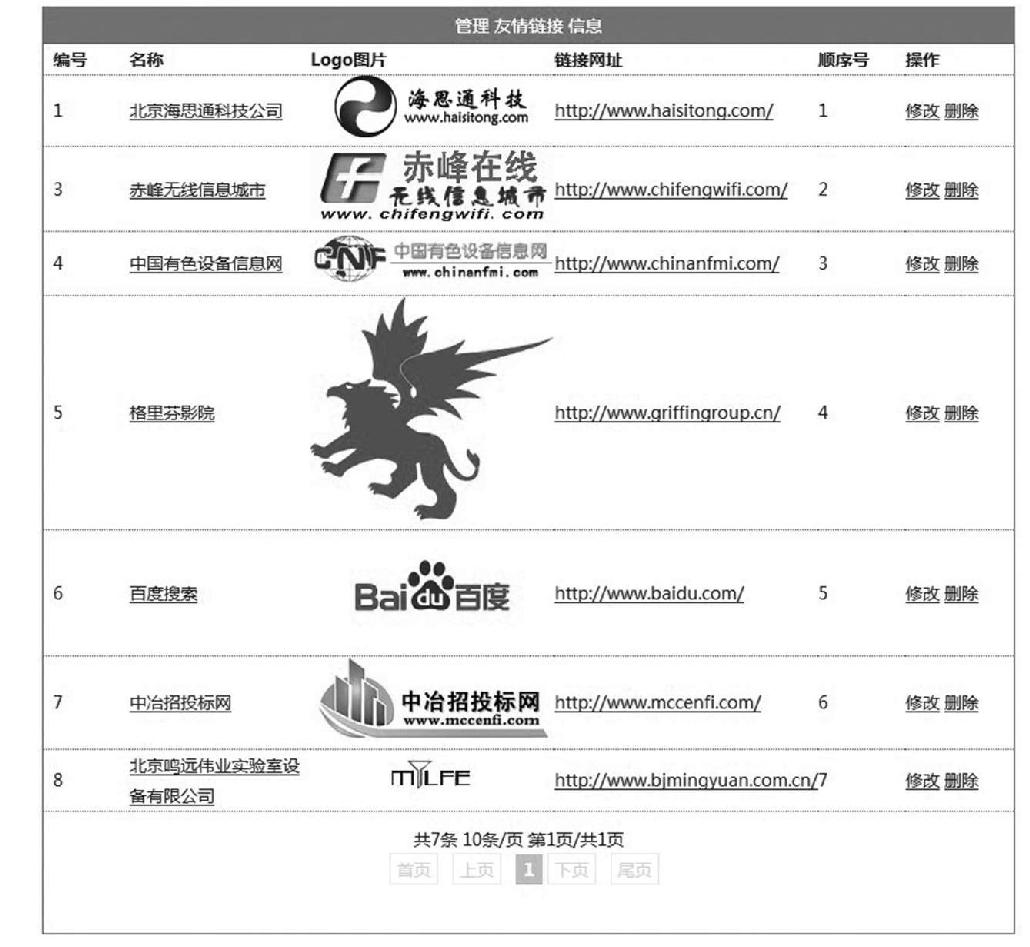
图11-37 视图ManageFriend.aspx预览效果
另外修改某个友情链接需要UpdateFriend方法及其对应视图表单UpdateFriend.aspx页面,而修改的视图表单页面依然需要一个提交信息处理方法DoUpdateFriend。删除友情链接只是一个行为动作,只需要一个删除方法DeleteFriend即可。
FriendController控制器完整代码如下。
using System;
using System.Collections;
using System.Collections.Generic;
using System.Linq;
using System.Web;
using System.Web.Mvc;
using Company_MvcApplication.Models;
namespace Company_MvcApplication.Controllers
{
  public class FriendController : Controller
  {
    //
    // GET: /Friend/
    DBHelper db = new DBHelper();
    public ActionResult AddFriend()
    {
       if (!Common.IsLogin())
       {
          Response.Redirect("/Login/Login");
       }
       return View();
    }

    public string DoAddFriend(string title,string url,string
    pic,int sortid)
    {
       if (!Common.IsLogin())
       {
          Response.Redirect("/Login/Login");
       }
       Hashtable ht = new Hashtable();
       ht.Add("@title",title);
       ht.Add("@url",url);
       ht.Add("@pic",pic);
       ht.Add("@sortid",sortid);
       string sql = "insert into tb_friend(title,url,pic,sortid)
       values(@title,@url,@pic,@sortid)";
       db.Execute(sql,ht);
       return "<script>alert('信息添加成功!');location.href=
       '/Friend/ManageFriend/';</script>";
    }

    public ActionResult ManageFriend()
    {
       if (!Common.IsLogin())
       {
          Response.Redirect("/Login/Login");
       }
       string sql = "select id,title,url,pic,sortid from
       tb_friend order by sortid asc";
       ViewBag.FriendTable = db.GetTable(sql);
       return View();
    }
    public string DeleteFriend(int id)
    {
       if (!Common.IsLogin())
       {
          Response.Redirect("/Login/Login");
       }
       Hashtable ht = new Hashtable();
       ht.Add("@id",id);
       string sql = "delete from tb_friend where id=@id";
       db.Execute(sql,ht);
       return "<script>alert('删除成功!');location.href='/
       Friend/ManageFriend/';</script>";
    }
    public ActionResult UpdateFriend(int id)
    {
       if (!Common.IsLogin())
       {
          Response.Redirect("/Login/Login");
       }
       Hashtable ht = new Hashtable();
       ht.Add("@id", id);
       string sql = "select id,title,url,pic,sortid from
       tb_friend where id=@id";
       ViewBag.FriendRow = db.GetRow(sql,ht);
       return View();
    }
    public string DoUpdateFriend(int id,string title,string url,
    string pic,int sortid)
    {
       if (!Common.IsLogin())
       {
          Response.Redirect("/Login/Login");
       }
       Hashtable ht = new Hashtable();
       ht.Add("@id", id);
       ht.Add("@title", title);
       ht.Add("@url", url);
       ht.Add("@pic", pic);
       ht.Add("@sortid", sortid);
       string sql = "update tb_friend set title=@title,
       url=@url,pic=@pic,sortid=@sortid where id=@id";
       db.Execute(sql, ht);
       return "<script>alert('修改成功!');location.href='/
       Friend/ManageFriend/';</script>";
    }
  }
}
控制器FriendController中ManageFriend方法对应的视图ManageFriend.aspx完整代码如下。
<%@ Page Language="C#" Inherits="System.Web.Mvc.ViewPage<dynamic>" %>
<%@ Import Namespace="Company_MvcApplication.Models" %>
<!DOCTYPE html>
<html>
<head runat="server">
<meta name="viewport" content="width=device-width" />
<title>ManageFriend</title>
<link href="/Content/AdminStyle.css" rel="stylesheet" />
<script src="/Scripts/jquery-1.7.2.min.js"></script>
<script>
$(document).ready(function () {
$(".myrow").hover(function () {
$(this).css("background-color", "#eeeeee");
}, function () {
$(this).css("background-color", "#ffffff");
});
});
</script>
</head>
<body>
<table width="800" border="0" cellspacing="0" cellpadding
="0" style="border: 1px solid #09F; margin: 5px;">
<tr>
<td height="30" colspan="6" style="background-color:
#09f; color: #ffffff; text-align: center; font-weight:
bold;">管理 友情链接 信息</td>
</tr>
<tr>
<td width="80" style="border-bottom: 1px dotted
#09F; font-weight: bold;"> 编号</td>
<td width="170" style="border-bottom: 1px dotted
#09F; font-weight: bold;">名称</td>
<td width="200" style="border-bottom: 1px dotted
#09F; font-weight: bold;">Logo图片</td>
<td width="170" style="border-bottom: 1px dotted
#09F; font-weight: bold;">链接网址</td>
<td width="80" style="border-bottom: 1px dotted
#09F; font-weight: bold;">顺序号</td>
<td width="100" style="border-bottom: 1px dotted
#09F; font-weight: bold;">操作</td>
</tr>
<%
System.Data.DataTable table = ViewBag.FriendTable;
int recordcount = table.Rows.Count;
int pagesize = 10;
int pagecount = Convert.ToInt32(Math.Ceiling
(Convert.ToDouble(recordcount) / Convert.ToDouble
(pagesize)));
string pagestring = Request.QueryString["page"];
int page = Common.GetPage(pagestring, pagecount);
int startindex = (page - 1) * pagesize;
int endindex = pagesize * page - 1;
if (endindex>= recordcount-1)endindex = recordcount- 1;
int minpageno = 5;//最少页号个数 起始页号数
int maxpageno = 10;//最多页号个数
int endpageno;
int startpageno = Common.GetStartPageno(minpageno,
maxpageno, pagecount, page, out endpageno);
for (int i = startindex; i <= endindex; i++)
{
%>
<tr class="myrow">
<td style="border-bottom: 1px dotted #09F;">
<%:table.Rows[i]["id"] %></td>
<td style="border-bottom: 1px dotted #09F;"><a href="
<%:table.Rows[i]["url"] %>" target="_blank"><%:table.
Rows[i]["title"] %></a></td>
<td style="border-bottom: 1px dotted #09F; text-
align: center;">
<img src="<%:table.Rows[i]["pic"] %>" onload
="if (this.width>200) this.width=200; if (this.
heigt>200) this.heigt=200;" alt="logo" />
</td>
<td style="border-bottom: 1px dotted #09F;">
<a href="<%:table.Rows[i]["url"] %>" target="_
blank"><%:table.Rows[i]["url"] %></a>
</td>
<td style="border-bottom: 1px dotted #09F;"><%:table
.Rows[i]["sortid"] %></td>
<td style="border-bottom: 1px dotted #09F;">
<a href="/Friend/UpdateFriend/<%:table.Rows[i]
["id"] %>" target="main">修改</a>
<a href="/Friend/DeleteFriend/<%:table.Rows[i]
["id"] %>" onclick="return confirm('确认删除吗?');
">删除</a></h6>
</td>
</tr>
<%
}
%>
<tr>
<td height="30" colspan="6" style="text-align: center;
line-height:30px;">
<% Common.ShowPage(recordcount, pagesize, page,
pagecount, startpageno, endpageno, "?");%>
</td>
</tr>
</table>
</body>
</html>
控制器FriendController中UpdateFriend方法对应的视图UpdateFriend.aspx完整代码如下。
<%@ Page Language="C#" Inherits="System.Web.Mvc.ViewPage<dynamic>" %>
<!DOCTYPE html>
<html>
<head runat="server">
<meta name="viewport" content="width=device-width" />
<title>UpdateFriend</title>
<link href="/Content/AdminStyle.css" rel="stylesheet" />
<script src="/Scripts/jquery-1.7.2.min.js"></script>
<link rel="stylesheet" href="/kindeditor-4.1.7/themes/
default/default.css" />
<link rel="stylesheet" href="/kindeditor-4.1.7/plugins/
code/prettify.css" />
<script charset="utf-8" src="/kindeditor-4.1.7/kindeditor.
js"></script>
<script charset="utf-8" src="/kindeditor-4.1.7/lang/zh_
CN.js"></script>
<script charset="utf-8" src="/kindeditor-4.1.7/plugins/
code/prettify.js"></script>
<script>
KindEditor.ready(function (K) {
var uploadbutton = K.uploadbutton({
button: K('#uploadButton')[0],
fieldName: 'imgFile',
url: '/kindeditor-4.1.7/asp.net/upload_json.
ashx?dir=image',
afterUpload: function (data) {
if (data.error === 0) {
var url = K.formatUrl(data.url, 'absolute');
K('#pic').val(url);
K('#p').attr("src", url);
} else {
alert(data.message);
}
},
afterError: function (str) {
alert('自定义错误信息: ' + str);
}
});
uploadbutton.fileBox.change(function (e) {
uploadbutton.submit();
});
});
function check() {
if ($("#title").val() == "") {
alert("名称不能为空!");
$("#title").focus();
return false;
}
if ($("#url").val() == "") {
alert("网址不能为空!");
$("#url").focus();
return false;
}
if ($("#sortid").val() == "") {
alert("顺序号不能为空!");
$("#sortid").focus();
return false;
}
return true;
}
</script>
</head>
<body>
<form action="/Friend/DoUpdateFriend" method="post" id=
"form1" name="form1" onsubmit="return check()">
<input type="hidden" id="id" name="id" value="<%: ViewBag
.FriendRow["id"] %>" />
<table width="900" border="0" cellspacing="0" cellpadding
="0" style="border: 1px solid #09F; margin: 5px;">
<tr>
<td height="30" colspan="4" style="background-
color: #09f; color: #ffffff; text-align: center;
font-weight: bold;">修改 友情链接 信息</td>
</tr>
<tr>
<td height="30" > </td>
<td>名称</td>
<td colspan="2">
<input type="text" id="title" name="title"
class="txt" value="<%:ViewBag.FriendRow
["title"] %>" /></td>
</tr>
<tr>
<td height="30"> </td>
<td>Logo图片</td>
<td width="321">
<input type="button" id="uploadButton"
value="上传图片" />(大小<=2mb)
</td>
<td width="400">
<input type="hidden" name="pic" id="pic"
class="txt" value="<%:ViewBag.FriendRow
["pic"] %>" />
<img src="<%:ViewBag.FriendRow["pic"] %>"
onload="if (this.width>200) this.width=200;
if (this.heigt>200) this.heigt=200;" id="p"
style="cursor: pointer;" onclick="window.
open(this.src)" title="单击查看原图" />
</td>
</tr>
<tr>
<td class="auto-style1"></td>
<td class="auto-style1">网址</td>
<td class="auto-style1">
<input type="text" id="url" name="url" class
="txt" value="<%:ViewBag.FriendRow["url"]
%>" /></td>
<td style ="font-size:12px; color:#ff0000;" class
="auto-style1">注:以http://开头,比如:http://www.
haisitong.com/</td>
</tr>
<tr>
<td height="30"> </td>
<td>顺序号</td>
<td>
<input type="text"id="sortid"name="sortid"
class="txt" value="<%:ViewBag.FriendRow["sortid"]
%>"onkeyup="if (isNaN(value))execCommand('undo')"
onafterpaste="if(isNaN(value))execCommand
('undo')" /></td>
<td style ="font-size:12px; color:#ff0000;">注:
只能填写整数,升序显示</td>
</tr>
<tr>
<td height="40"> </td>
<td> </td>
<td colspan="2">
<input type="submit" id="b1" name="b1"
value="确认修改" class="btn" />
&'nbsp;
<input type="reset" id="b2" name="b2"
value="重置表单" class="btn" />
</td>
</tr>
</table>
</form>
</body>
</html>
11.4.11修改口令
修改口令功能在LoginController控制器中,增加一个ChanagePassword方法及其对应的视图表单页面ChangePassword.aspx,视图表单页面ChangePassword.aspx预览效果如图11-38所示,另外也需要一个表单提交处理的方法DoChangePassword。

图11-38 视图表单页面ChangePassword.aspx预览效果
LoginController控制器中ChanagePassword方法及DoChanagePassword方法完整代码如下。
  public ActionResult ChangePassword()
       {
          if (!Common.IsLogin())
          {
          Response.Redirect("/Login/Login");
          }
          return View();
       }
       public string DoChangePassword(string adminuser, string pwd)
       {
          if (!Common.IsLogin())
          {
              Response.Redirect("/Login/Login");
          }
          string result = string.Empty;
          Hashtable ht = new Hashtable();
          ht.Add("@adminuser",adminuser);
          ht.Add("@pwd",Common.Get_MD5(pwd));
          string sql = "update tb_admin set pwd=@pwd where
          adminuser=@adminuser";
          db.Execute(sql,ht);
          return "<script>alert(‘口令修改成功!');history.back();</
          script>";
       }
在LoginController控制器中ChangePassword方法对应的视图表单页面ChangePassword.aspx完整源码如下。
<%@ Page Language="C#" Inherits="System.Web.Mvc.ViewPage<dynamic>" %>
<!DOCTYPE html>
<html>
<head runat="server">
<meta name="viewport" content="width=device-width" />
<title>ChangePassword</title>
<link href="/Content/AdminStyle.css" rel="stylesheet" />
<script src="/Scripts/jquery-1.7.2.min.js"></script>
<script>
function check() {
if ($("#pwd").val() == "") {
alert("必须输入新口令!");
$("#pwd").focus();
return false;
}
if ($("#pwd").val() != $("#pwd2").val()) {
alert("两次输入口令必须一致!");
$("#pwd2").focus();
return false;
}
return true;
}
</script>
</head>
<body>
<form action="/Login/DoChangePassword" method="post"
id="form1" name="form1" onsubmit="return check()">
<table width="800" border="0" cellspacing="0" cellpadding="0"
style="border: 1px solid #09F; margin: 5px;">
<tr>
<td height="30" colspan="3" class="auto-style2"
style="background-color: #09f; color: #ffffff; text
align: center; font-weight: bold;">修改登录口令</td>
</tr>
<tr>
<td width="26" height="30"> </td>
<td width="155">登录账号</td>
<td width="617">admin<input type="hidden"
id=<sup>"</sup>adminuser" name="adminuser" value="<%=Request.
Cookies["adminuser"].Value %>"></td>
</tr>
<tr>
<td height="30"> </td>
<td>输入新口令</td>
<td>
<label for="textfield"></label>
<input type="password" name="pwd" id="pwd"
class="txt" /></td>
</tr>
<tr>
<td> </td>
<td>确认新口令</td>
<td>
<input type="password" name="pwd2" id="pwd2"
class="txt" /></td>
</tr>
<tr>
<td height="40"> </td>
<td> </td>
<td>
<input type="submit" name="b1" id="b1" value="
确定修改“ class="btn" />
<input type="reset" name="b2" id="b2" value="
重置表单" class="btn" />
</td>
</tr>
</table>
</form>
</body>
</html>
11.4.12 退出系统
退出系统只是一个行为动作,目的就是删除登录时定义的cookies变量,于是在LoginController控制器中增加一个Exit方法即可完成,Exit方法完整代码如下。
    public ActionResult Exit()
    {
       Response.Cookies["adminuser"].Value = "";
       Response.Cookies["adminuser"].Expires = DateTime.Now.
       AddDays(-1);
       return RedirectToAction("Login");
    }